Aanbevolen post

Wintervoorn stekken

In het artikel, wintervoorn , is een manier besproken om te vissen op de wintervoorn. In dit artikel gaan we verder in op de verschillende l...

Leaders II

Voor het maken van een leader hebben we de volgende hulpmiddelen nodig:
-Een geschaafde lat van ongeveer 2.5 mtr lang, ongeveer 10 cm breed en 1.5 cm dik waarop de diverse bevestigingspunten komen om de leader te twijnen.
- Een haakje/oog voor het aanhaken van het begin van de leader, punt A.
- Een viltstift.
- 3 gewichten bv. zeelood van ieder ong. 50 gram.
- Watervaste secondelijm.
- Schaartje.
- Paar verzonken spijkers ( zonder platte kop).
- Haarföhn.
- Rol 10/00 vissnoer voor een 9 ft. # 4 – 6 hengel. Voor een # 3 hengel 08/00 snoer en een # 7 – 8 12/00 snoer.
Zoals hierboven staat hebben we een niet te slappe lat nodig die in verticale stand tussen het plafond en de vloer moet worden bevestigd.

Je kunt hem bv. met een lijntang tegen een deur bevestigen, wel even voor de eventuele beschadigingen er een bierviltje tussen doen.
Wat ik zelf heb gedaan is in mijn berging de haak en spijker in de muur bevestigen en heb de maten met de viltstift op de muur geschreven. Hierdoor heb je de lat in het geheel niet nodig. Dit werkt ook veel makkelijker.

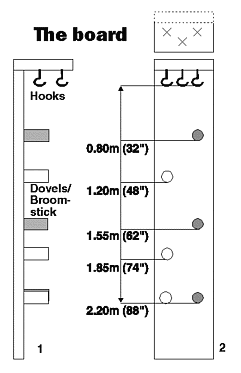
Nu gaan we de “’verjongsmaten”” op de lat/muur aanbrengen, zie de schets.
Draai het oog A op ongeveer 10 cm van de bovenzijde in het midden van de lat of in de muur.
Vanaf het oog naar beneden tekenen we met gebruik van een winkelhaak en de viltstift een lijn op 75 cm onder het oog op de lat. Zet in het midden daarvan het merkteken 7x
Teken onder de eerste lijn weer lijn op 60 cm afstand daarvan met daartussen in het midden weer een merkteken maar dan 5x
Teken vervolgens daaronder weer op 45 cm van de tweede lijn de onderste lijn, met daar tussenin weer een merkteken 3x
Zet vervolgens boven en onder de bovenste lijn ( 75 cm ) een stippellijn op 10 cm boven en onder de ononderbroken lijn. Merk deze stippellijnen met een 1 op de bovenste en een 2 op de onderste stippellijn.
Zet ook boven en onder de tweede lijn ( 60 cm ) een stippellijn op 10 cm er boven en weer 10 cm er onder en merk deze lijnen ook met 1 en 2.
Als laatste een stippellijn op 15 cm boven de onderste ononderbroken lijn.
Nu timmeren we nog een spijker P aan de zijkant van de lat op ongeveer 20 cm van de onderste lijn. Dit is een parkeerpunt voor de eerste streng van de leader. Hebben we de merktekens op een muur aangebracht, dan een spijker of haakje 20 cm naast en boven de onderste lijn.
Dit zijn de maten en merktekens voor het aanbrengen van de verjonging in de leader.
Zie voor de details de tekening hieronder.

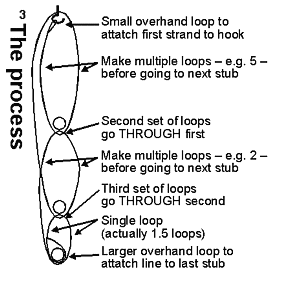
De leader die we gaan twijnen bestaat uit 2 strengen.
Een streng is weer verdeeld in 3 delen, te weten het bovenste deel uit 7 draden, het middelste deel uit 5 draden en het onderste deel uit 3 draden. Door deze verdeling van boven naar beneden komt er een verjonging, een tapse vorm in de leader.
De strengen winden we per stuk in dezelfde richting op ( belangrijk ) en wel van de onderste lijn naar de daar boven staande eerste stippellijn. Blijven draaien tot de stippellijn is bereikt.
Bij het winden van de tweede streng, parkeren we de eerste streng tijdelijk achter de spijker P.
Als we beide strengen gereed hebben twijnen we vervolgens de beide strengen in elkaar.

Na deze informatie aan het werk met het twijnen van de leader.
Als de maatverdeling op de lat/muur is aangebracht leggen we met behulp van een 8 knoopje een lus van ongeveer 10 cm in het vissnoer. Knip het restant strak tegen de knoop af.
Leg de lus over de bovenste haak en neem een van de gewichten.
Ik heb gebruik hiervoor zeevis gewichten zgn. ankerlood. Ik heb de zgn. ankers op een na met een tang afgeknipt en van die laatste een ruime haak gebogen.
Zorg er wel voor dat alles vrij is van bramen en scherpe kantjes om het vissnoer niet te beschadigen.
Het zou zonde zijn als je leader hierdoor een beschadiging zou oplopen.

Nadat de lus dus over de haak is geplaatst hangen we het gewicht in de bocht van de lijn en stellen het gewicht zo af door met het gewicht te schuiven dat het gewicht op de bovenste stippellijn 1 hangt. Sla nu de lijn 3 ½ x tussen haak en gewicht zodat daartussen 7 draden ontstaan. Dit is de eerste verjonging.

Vervolgens gaan de we een trap naar beneden naar de 5x.

Hierbij verlengen we de draad ( de 7e lijn ) naar beneden en hangen een tweede gewicht in het snoer op de stippellijn 1 boven de 45 cm lijn. Sla nu de lijn 2 ½ x rond waarbij het rolletje snoer nu ook elke keer door de bovenste lus ( de 7 draden ) gehaald moet worden en om de haak van het gewicht gehaald moet worden zodat daartussen 5 draden ontstaan. Dit is de tweede verjonging.

Haal nu het bovenste gewicht weg en gebruik dit voor de laatste trap. Het tweede gewicht blijft hangen.
Verleng de draad weer en hang het gewicht nu op de onderste ononderbroken ( doorgetrokken ) lijn.
Sla het snoer 1 ½ rond nu door de tweede lus ( de 5 draden ) en om de haak van het gewicht zodat er 3 draden ontstaan.
Maak aan het einde van de naar beneden hangende draad een lus met een 8 knoopje, knip het restant weer weg.
Kien het zo uit dat de onderste lus ongeveer op de onderste lijn uitkomt en hang de lus ook in het gewicht.

Terwijl de streng nog in de bovenste haak hangt haal je nu het middelste gewicht weg en neem de loshangende streng tussen duim en wijsvinger. Laat de vingers even over de streng glijden en voel of alles glad is op de “verjongingspunten”.
Draai vervolgens ( twist ) de streng net zo lang op, steeds naar rechts of links draaien door aan het lood te draaien, tot hij de eerste onderste stippellijn heeft bereikt. Van belang is wel dat de beide strengen in dezelfde richting zijn getwist. Dus beiden naar rechts of beiden naar links.
Hang nu de eerste streng tijdelijk achter de spijker P. Let wel op dat hij niet terug gaat draaien.

Herhaal deze procedure nog een keer met de tweede streng met dien verstande dat de gewichten nu niet op de bovenste stippellijnen 1 moet komen te hangen maar op de stippellijnen 2. Dit omdat als beiden strengen zo direct in elkaar twijnen de verjongingspunten niet tegen elkaar komen en het geheel nog meer in elkaar overgaat, nog mooier “verjongd”.
Maak ook aan het eind van de tweede streng weer een lus op de onderste lijn zodat beiden strengen even lang worden en haak het gewicht ook nu weer in de onderste lus.

Hierna de tweede streng opdraaien tot de onderste stippellijn zodat beide strengen even lang worden.
Neem nu de eerste streng van de spijker P en haak de beide strengen aan een gewicht. Ik doe dit met behulp van een dubbingnaald waarbij ik bij een van de strengen de lus iets help te vergroten waardoor het overbrengen op de haak makkelijker gaat.
Laat de nu ingehaakte strengen los en door het gewicht zullen de beide strengen gaan tollen en in elkaar gaan twijnen tot een streng, de uiteindelijke leader.
Als het geheel is uitgedraaid, doe dan een druppeltje secondelijm op de bovenste 2 centimeter van de leader om de lus te fixeren.
Let er wel op dat dan de lus even heen en weer moet worden gehaald tot de lijm droog is om de leader niet aan de haak te plakken.
Fixeer op dezelfde wijze ook het onderste oogje van de leader.
Haal nu het gewicht uit het onderste oog en laat het geheel los.Het zal nu wat gaan kringelen, laat dit gebeuren.
Strijk vervolgens de leader tussen duim en wijsvinger glad en haak het onderste gewicht weer in.
Neem nu de föhn en zet de temperatuur op handwarm ongeveer, 40 graden.
Ga vervolgens met de föhn over de gehele lengte langs de hangende leader. Door de warmte zal de leader gaan strekken en het geheugen zal verdwijnen.
Knoop nu aan de onderzijde van de leader 30 cm nylon van 20/00 en aan die onderzijde eventueel een klein ringetje waaraan de tip kan worden geknoopt.
Het lijkt mogelijk wat ingewikkeld, maar na wat oefening maak je er zo 3 per uur.


Bron

Leaders

Introduction

By Martin Joergensen

The following description on how to make your own twined leaders was given to me by Henk Verhaar from Holland. Henk's description fascinated me so much, that I made the first set of three leaders already the first night after having received the description.
Since then and since these pages were made, I've produced several more leaders, and I've had several reactions from other people who have tried - all of the positive. People are generally pleased with the suppleness of these leaders and their ability to turn over very smooth and easily. They do so more than any other type of leader I have tried. try casting one with your hand, if you ever make one. Amazing...
Making the board was very easy and understanding the process too. I used the exact process as described by Henk for the first leader, but soon made my own variations.
Never the less Henk's description still holds up and produces some very fine and inexpensive leaders.
In his book Micropatterns, Darrel martin mentions furled leaders, which are a lot similar to Henk's twined ones.

<

Henk Verhaar's twined leader. This one is made from Maxima which is a dark and fairly stiff line. See a closeup below
Close up of twined leader
Detail of Henk Verhaar's twined or furled leader.

Braided leaders

I always preferred braided leader butts over hand-tied leaders, let alone knot-less tapered leaders.
While hand-tied leaders are reasonably cheap, if home-made, and can be tailor-made to fit all possible circumstances, I didn't care too much for tying up all those barrel knots, especially while on-stream, plus there was this time that I generated too many wind knots in my leader to really enjoy FFing ;-)
Every now and again (well, more like every hour or so) the wind knot would end up in the butt section of the leader, and would invariably be much too tight to even consider untangling it, leaving only two options: rebuild the leader from the clipped butt downwards while on the stream or scrapping it altogether and tying on yet another leader. The braided leader butt didn't have these drawbacks -- they offered, to me at least, better presentations, more ease of use, and almost all knots in the braid are simple to unravel.
Their one main drawback was their price. I had of course heard of the tricks one could play with the level braided mono lines, to build a taper in them by removing strands at different lengths, but this seemed to me to be more trouble than it was worth. So I continued buying tapered braided butts and trying to be careful with them.

Twined

Then one day there was this guy at our monthly FF club meeting showing us how to create simple, very effective twined leader butts, that could be home-made with a few inexpensive supplies, had all the advantages of braided butts, and could be custom tapered and modified to be at least at versatile as knotted leaders; even more, since this design allowed for interesting things as creating sinking leaders by adding copper wire.
Another advantage of the twined butts is that they additionally act as shock absorbers, since the twist acts like a coiled spring -- thus obviating the need for e.g. a piece of powergum in the instances where this is called for (to be honest, there's also a drawback to this recoil effect: when you get your fly stuck in a tree or other object some distance away and have to pull the line to tear it free, you 'load the spring' of the butt quite heavily, and when the fly comes loose, the coil will unwind rapidly, severely twisting your leader tippet -- this can, however, almost always be undone easily and without lasting ill effects).
Suffice it to say, that after I procured the materials to make these twined leader butts, and made a few to acquaintance myself with the procedure, I haven't used anything else since!
So how does one make such a twined leader butt? I'll start out by describing the needed materials, then describe the basic procedure for a standard butt, ending with an indication of all the possible customizations.
The board

Materials needed

Most important is what I'll call the leader board. This basically is a 2.4 m long, 25 cm wide wooden board with a smaller
board overhanging the top, three hooks attached to the underside of the overhang, and a number of plugs, attached to the board, beneath the two outermost hooks. See figures 1 and 2 for general idea of setup and for some standard measurements.
The board can be homemade from available scrap wood having the correct dimensions -- attachment of the overhang is with dowels and glue. The plugs are cut sections from a round stick (like a broomstick) about 2 cm in diameter, and are attached to the board with dowels. Use the distances shown in figure 2 to start with. They can be either glued down, or just stuck into holes in the board -- this makes it possible to alter the custom taper of the butt by changing the plugs to a different set of holes. More on this later. Draw a line across the board at approximately 2.00 m down from the hooks (or 90% of the distance from the hooks to the lowest plugs).

Weights

Next item is some heavy lead weights with attachment loops. I use surf casting lead weights with anchors (these are normally bent outwards to assist anchoring of the weight to the bottom, but in our case are kept straight so as to facilitate turning the weight), and a heavy wire snap as attachment loop, although a heavy paperclip could be adjusted for this purpose also. See also figure 6.
The weight

Other stuff

Some superglue will be necessary to seal the two ends -- again, more on this later -- and finally a roll of mono to make the leader butt. Yes that's right, you need just ONE roll, one strength of mono, to make an entire butt. I usually buy this in 100m rolls. 100 m (110 yards) will make you three complete butts. For trout and other light line leaders I use 12/00 mm dia. mono (this is similar to 6X). For light saltwater work I may step this up to 15/00 (5X) and for heavy pike streamer leaders even 18/00 (4X). But to get started, you can get by with just one 100 m roll of 6X.

Procedure

The basic idea is to make two leader halves, twist these separately, then tie them together and let them untwist -- if done properly, the untwisting of the separate strands wil twist the entire leader in the opposite direction. This is not unlike what happens when making rope in a rope-making factory (there should be a specific English name for such a place, but I'm not familiar with it -- in Dutch it would be a 'Lijnbaan' or 'Touwslagerij').

Making a furled leader

The two halves are similar. You should be studying figure 3 for a schematic 
The process
representation of the procedure
  1. Take the roll of monofilament and make a simple overhand loop in the free end of the mono.
  2. Attach the loop to one of the outer hooks on the overhang.
  3. Bring the mono around the uppermost plug and then back around the hook, all the while keeping a certain amount of tension on the mono.
  4. Bring it around 5 1/2 times, thus creating 5 1/2 loops between the hook and the plug (or 11 strands of mono).
  5. The last strand (the last 'half loop') doesn't go around the uppermost plug but continues down to the second plug, goes around, and then back up to the upper plug.
  6. Bring it BEHIND the 5 strands of mono forming one side of the first set of loops, then bring forward through the loop, and down, so that it now is linked to the upper set of loops, on the UNDERSIDE of the plug.
  7. Make 2 1/2 loops (or 5 strands) this way, then continue to the lower plug.
  8. Make 1 1/2 loop here, in the same way described for the second set of loops, then make an overhand loop in the mono, so that we can attach the last 1/2 loop to the plug. You now have a set of interconnected loops, sitting on the plugs.
  9. Cut the mono, just after the knot. All this should have been done under a slight but constant tension.
  10. Check all the loops for evenness and even tension. Then make the second half in the same way.
TwistingTwining

Twisting

You now have the two halves sitting as sets of connected loops on the leader board. Refer to figure 4 for this part of the procedure. Attach a lead weight to each of the lower sets of loops, by means of the paperclip attachment. Then gently slide the sets of loops off the plugs, starting at the lower plugs and working upwards. Now grab one of the lead weights by the anchors and start twisting it clockwise, as seen from below, until it is 10 % shorter than it was, using the line drawn across the board as a reference.
MAKE ABSOLUTELY SURE THAT DURING THE TWISTING, TENSION IS MAINTAINED ON THE HALF LEADER, OTHERWISE LET UNWIND AND START AGAIN. THIS IS ESSENTIAL!
Fasten the lead weight to the board, by means of a rubber band or pin and twist the second set of loops, by means of the second lead weight, IN THE SAME DIRECTION. THIS IS ALSO ESSENTIAL! Make it the same length as the first one and attach the lead weight to the board.

Twining

Now with the two lower ends firmly attached transfer the two top end loops, one by one, and very carefully, to the middle hook. Use e.g. a heavy darning needle, or a splicing needle for this. With the two halves transferred to the middle hook, transfer the 'paperclip' of one of the lead weights to the small end loop of the other half leader, then remove the second 'paperclip' and transfer the lead weight from this 'paperclip' to the one attached to both leader halves. Now detach the bottom ends of the leader from the board, and place the board so that the leader will hang down undisturbed. You'll notice that it'll start to twist 'back' resulting in a twined leader.
Wait until the lead weights stop spinning and come to a full rest. Treat the upper and lower loops with superglue to seal the two halves together. Detach the lead weights from the leader and the leader from the hook and shake a few times to remove residual twist strain.
The large top loop can be attached directly to any loop system on the end of the fly line. The small tippet end loop can be used in a number of different ways. My personal favorite is to attach a short length of 1X mono, looped on both ends, to the small loop, with a loop-to-loop hitch. Then a long length of, say, 3X is attached with a loop-to-loop hitch to the 1X loop, and the rest of the tippet (5X, 5X-6X, 5X-6X-7X) is built up with normal knots. You're now ready to make your first cast with your new twined leader butt!

Variations

By Martin Joergensen
There's three basic variations:
  1. You can vary monofilament strength (and characteristics of course) to get heavier and stiffer or lighter and more supple leaders. Anything heavier than 3X will however be too stiff to allow even twisting, while anything lighter than 7X will be too fragile to handle (at least for my clumsy hands...).
  2. You can change the strength AND the steepness of the taper also by varying the number of loops, or strands in the different parts of the leader butt. My basic description gives a 7' butt with a taper going from 22 - 16 - 10 - 8 - 6 strands, equivalent in weight, when using 6X mono, to 56/00 - 48/00 - 38/00 - 34/00 - 29/00 mm. Experimentation with steepness is limited (almost) only by your imagination, BUT you'd be hard pressed finding a way to make the final section less than 6 strands...
  3. And finally, you can vary the distances between the plugs, influencing the places in the butt where the transitions are located. However, the given locations are known to work.
Furled leader board, new editionThe method and the board
Martin Joergensen
I tried using the weights for making the twined leaders as described by Henk Verhaar, but soon got tired of spinning. In stead I started using a hand held cable free drill, and that actually worked like a charm. I stuck a hook in the drill and grabbed the lower loops of the leader with this hook and drilled away. A minute for each half was suitable (it's a slow drill).
After doing this, I used Henk's description to finish the leader, but actually thought of using the drill to twine the strands too. The advantage of the drill is that the whole process can be done with the board lying down and that (almost) no manual work has to be done.

Number of strands

I also experimented with the number of strands and thickness of the line. I used 0.18 (4X) line for my first leaders and was quite pleased with the result.
My last variation was in not using superglue (I didn't have any and I generally don't like gluing line). I just caught the loops with a thicker strand of monofile, and attached the leader to a loop on my fly line with the help of this strand. After attachment to the loop at the end of my fly line I just removed the strand of mono. The joint is smooth and effective. At the business end I used a Trilene knot to attach the tippet right away. This is not as good as I'd like, but will work until something better comes up.
The leaders are indeed very good: they stretch very fine but still have a delicate movement. They come cheap -- I made three from a spool of monofile that cost DKK 40.- (US$ 8.-). That would normally buy me one braided leader here in Denmark.

Latest version

My latest variation on Henk's leaders is on length and placement of the plugs in relation to each other. I did a bit of spreadsheeting, and drew some curves. My final leader formula is as follows:
The plugs have been moved a bit. This doesn't have the big effect, but when using my formula it produces a smoother taper. The single plugs or rows are set as follows:
  1. Hooks
  2. 80 cm
  3. 130 cm
  4. 160 cm
  5. 188 cm
  6. 220 cm

The hooks and the 220 centimeter plugs go for both sides, while the rest interchange between the sides (80/160 on one side, 130/188 on the other). You should definitely experiment with this and work out your personal favorite formula.

Salt water leader

For my general purpose salt water leader I use 0.23 (2X) Berkly Trilene line which is thick but very soft. I make 2½ turns on top 1½ turn in the middle section an 1 turn on the lower.
The single turn is made by tying the tag end to the lower section of the middle loops in stead of to the bottom plugs. This produces a nicely tapered leader with a fine tip of four strands. I attach a section of 0.26 (1X) to the tip of the twined leader if I want a longer tippet. If not I use a 50 cm (1½') piece of 0.23 (2X) Drennan Double Strength as a tippet.
This setup works like a charm for my 6-7-8 wt. salt water setup with almost any fly from size 10 to 2.
All'n'all a great type of leaders.

One strand method

You can make the whole leader from one single strand (mono, tying thread, Kevlar or whatever) by starting at one butt peg with an overhand loop (making this large - like half the distance between the pegs - will make the butt even heavier), do the first leg as you usually would, decreasing the number of loops and finally ending at the tip peg. But in stead of tying off here with a new overhand knot, you simply continue to the other leg, increasing the number of loops for each set of pegs and finally ending up at the other butt peg where you tie off the string with a new overhand loop.
You now need to spin the two legs individually from the butt end (since they are connected at the tip) and then put them together and unwind them before catching the two butt loops and either tying them or gluing them together to keep the leader from unraveling. Tie a tippet to the tip loop before unhooking it, because it closes very tightly when unhooked., Alternatively you can glue it to keep it open. This method gives fewer knots in the tip and allows for some very delicate two-strand tips if you want.


http://globalflyfisher.com/fish-better/twined-or-furled-leaders

Vliegenhengel bouwen


Interessante links

o jsflyfishing.com
o store.hookhack.com
o rutenbau.eu
o fishboneshop.be
Hilevel.se